Archive for Catalogs

Yes, I did fall off the face of the planet

I’ve been in heaven! I became a new mom a little over two weeks ago. You can read all about my beautiful new baby boy (and see lots of pictures, more of which will be posted shortly) on our family blog. I’ll respond to Sale page requests and pending emails shortly!

On the stampin’ front, I whipped up this quickie 5×5 altered book for my friend’s baby shower before the stamp room gets packed up for the move. (And I did it wearing my baby!)

I wanted a little notebook where guests could write in advice to the new mom and this 5×5 was the perfect size (and with 20 pages, the really really perfect size).

Patterned paper is a combination of the not-yet-released new designer series paper and some spring paper from 06, I think. Crafty postings will resume in July once we get settled in our new house.

You may not hear much from me here in the next several weeks, but I promise to come back with lots of new ideas once the new catalog is released in July!

Itty Bitty Increase

Stampin’ Up! has done a fantastic job of keeping prices low in the face of increased production, postage, and fuel costs. In fact, they haven’t had an across-the-board price increase in 10 years! Instead, Stampin’ Up! has absorbed most cost increases but has also managed to maintain or increase quality, remaining steadfast in producing the highest quality rubber stamps on the market (rather than switching to cheaper products, like acrylic). As a result, customers have been incredibly loyal and we’ve all benefitted from (and maybe have been just a teeny tiny bit spoiled by) these low, constant prices.

So, when Stampin’ Up! recently announced to demonstrators that there would be a small price increase (5% on average) beginning with their new Fall/Winter 07 Collection, I wasn’t surprised. (The biggest increase seems to be on cardstock, which will increase to $5.50 for 8-1/2×11). In fact, I was rather thrilled to learn that Stampin’ Up! is not increasing shipping prices! (An amazing feat given two postal rate increases in the past few years and the fact that Stampin’ Up! keeps its product and shipping costs separate.)

Better still, Stampin’ Up! was kind enough to give us a heads-up so that we could take advantage of the current lower prices before they go away and let our customers do the same thing. So, whether you’re a customer or demonstrator, now is a great time to stock up on paper, ink, refills, and other staples.

Baby favors

favorboxesjmbaby007-web.jpgI mentioned before that I was addicted to explosion boxes, didn’t I? They’re just so easy and fun to open!

Well, I had to come up with favors for a friend’s baby shower, so explosion boxes were the obvious choice. And given everything else going on in my life, I needed it to happen quick and easy so I could ship them out asap. So…

I made 2″ explosion boxes out of double-sided designer series paper (from spring 2006, I think…) and decorated with a big retro flower punch and buttons.

The biggest problem for me was coming up with a decoration for the top. My friend is having a boy. And my mind was drawing a blank when it came to “boy” stuff. Besides, I really (really, really) wanted to use this flower punch, so I compromised. favorboxesjmbaby005-web.jpg

I used (baby) boyish colors (celery and bashful) and mostly patterned papers (even for some of the flowers). Given that the favors are for women, I decided that flowers — simple flowers — were a good choice.

Now I need to figure out what to include inside the boxes. I can’t ship anything meltable (chocolate, candles). Hmmm…. Any great ideas?

Next up…thank you cards appropriate for business. Stay tuned…

[Re]Mixed Bouquet

Distressed Emboss??

OK, folks, I’m not sure if I created a new technique (or discovered an existing one I didn’t know about), or if this is a total flop. You tell me. (Seriously, I’m pretty thick-skinned.) I decided that I hated the old frame matte in those springy colors (I’m such an “earth” person), so I revamped it into something that I might actually use.

First, I inked the entire matte with Old Olive (craft) ink. Once that dried (with the help of a handy dandy heat gun), I stamped the rose from Mixed Bouquet in Versamark around the frame and sprinkled on gold embossing powder.

But…the excess embossing powder wouldn’t shake off. (That craft ink has to be really, really dry. Think days.) I brushed off as much as I could without knocking too much powder off of the images and heat set it anyhow. The mottled effect was kind of groovy, and I liked the subtle emergence of the roses here and there. So, I repeated the embossing with a chocolate embossing powder for some pop. (Oddly, this time, the craft ink was dry and the excess didn’t stick.) I actually liked it, so I decided to leave well enough alone.

I think it’s got potential. I’m calling it “distressed embossing,” unless, of course, the technique already exists (please, someone clue me in here).

It’s almost here…taking preorders!

Beginning this summer, Stampin’ Up! will release TWO comprehensive semi-annual catalogs. For a limited time, I’m taking preorders for the Fall/Winter Collection catalog, which will be released on July 1, 2007. Preorders are available for HALF PRICE at only $5 each including tax (and including shipping for local pickups). Or, if you need the catalog shipped to you, the cost will be $10 including priority mail with delivery confirmation (within the U.S.). Preorder payment must be received by May 31st to ensure the lower price. Once the catalog is released (or once I run out of extras, whichever comes first), the catalog will only be available as an order item for $9.95 plus tax and shipping.

The art of CASEing

Explosion BoxOne of the fabulous things about the rubber stamping community is that we’re crafters who love what we do so much that we always encourage others to try new things. And we never hesitate to show others the ease and beauty of our crafts. One of the best ways to expand our horizons and improve our skills is to push our limits. To do that, we often Copy And Share Everything, or CASE.

The bevy of projects in the annual (and soon to be semi-annual, woo hoo!) Stampin’ Up! Idea Book & Catalog is a great starting place to CASE others’ ideas, but sometimes I need different or new fodder to spark my creativity. Sometimes I find great ideas for patterns in catalogs or advertisements. Sometimes I turn to stamping or paper crafting magazines or other publications. But often I find myself surfing the Web and I always end up at splitcoaststampers.

Last week, Beate did a tutorial on one of my favorite projects: explosion boxes. I already knew how to make these in any size, but I found inspiration there nonetheless. I loved her use of Au Chocolate designer series papers along with Mixed Bouquet.

I wanted to give Mixed Bouquet, one of my favorite retiring sets, a final farewell. Besides, I needed the inspiration for my first-ever {blog candy} that Alison won a couple of weeks ago. (Yeah, yeah, I did it backwards. Next time, I’ll make the candy first, then give it away…I get it.) I hope she thinks it’s worth the wait (fingers crossed)!

Nesting Explosion

Nesting Explosion Boxes openSo I decided to CASE Beate’s project, but with a little twist. I used one of my favorite colors ever, Cool Caribbean, which is also retiring along with the rest of the In Color lineup (another adieu). Then I looked over at the little Russian nesting doll in my stamp room and it occurred to me that maybe a nesting set of explosion boxes could be a fun thing too.

So this is what I came up with. If you like it, feel free to CASE it for personal use. Shake it up, change it, make it your own. Have fun and share it with a friend. (Just be nice and tell folks where you got your inspiration, especially if you post in on the web.) Complete recipe and cutting dimensions available here.

Folks, my apologies for the long delay since my last post and delays in my responses to any personal emails. I expect to be able to reply to emails shortly. Custom orders may be delayed, but you will receive an email from me in the next several days if that is the case. Life is, once again, in overdrive. If you’d like to read about the crazy stuff in my personal life, you can visit my adoption blog.

Something for mom (or grandma, or…)?

Mother Clipboard

This is one of the projects we made at my last stamp class. I couldn’t resist this gorgeous color combination in shades of sherbet (click on image for recipe).

The basic layout is the same as my Chipboard Clipboards, but this time I used the double-sided paper from the Spring mini. Aren’t these stripes just scrumptious?? As with the previous edition, these are intended to be photo magnets. Perfect for the fridge!

Here’s an idea: simply replace the word “mother” with “daughter” or “son” or “family,” trim a favorite photo to 3×3 and clip in for a Happy Mother’s Day! Or, make for each of the (grand)kids and I’ll bet they find a favored spot on the fridge!

Alternative: the clip is completely removable, so you could alter both sides with different (seasonal?) colors. Then mom/grandma can flip it over for a change of scenery!

Take it or leave it?

Mixed Bouquet Matte
I have mixed feelings about this Mixed Bouquet frame matte. I hesitated even posting it here and I didn’t put my watermark on it (Images copyright Stampin’ Up!). Originally I thought it would look nice in a stamp room with some kind of saying inside (“inspire” “create” or a nice phrase?). The matte is big (11×14) and will hold a regular-sized sheet of cardstock, so I figured that printing something out on the computer would be ideal. But I’ve been going back and forth about it. One minute I hate it, the next I love it. Right now, I hate it. I can’t tell if it’s the ink colors (click on image for a list)? The vanilla background? The gold matte liner? The stamp set? What do you think?

Seeking Inspiration

wallet cardFirst of all, my apologies for the lack of photos lately. I haven’t had much time to stamp, and I got a little sidetracked with my beaded spoons the one time I allowed myself some “free” time. Between work (which suddenly became full-time) and a bunch of crazy adoption stuff, life has been a little more than wacky here.

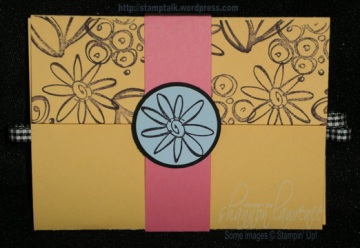
I have been trying to come up with a great idea for Alison’s {blog candy} surprise. But I’m in a bit of a creative funk, so I started going through projects I had already made with the Mixed Bouquet stamp set. What I found was this coolio card/wallet thingy (which isn’t going to Alison, but is in the mail to someone else as part of a bigger “order” hint hint).Wallet Card Open

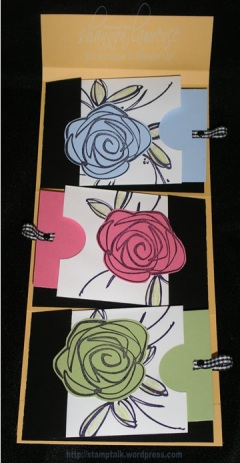
I’m just looking for Mixed Bouquet inspiration…and I have some ideas knockin’ around my my noggin, but you’ll have to wait awhile longer before they become a reality. I promise, though, I’ll post the second I create the surprise…

I had intended to upload this wallet card several weeks (months?) ago, but it somehow fell through the cracks. But I know y’all are dyin’ for some photos since you’re just downright tired of my ramblings, huh? So, here’s some fodder for creativity.

The pattern is an SU! original, I believe, although I did make some adjustments. The SU! design required “mini” envelopes that come as part of a set of cards and envelopes (not sold separately). But that didn’t make any sense to me. I certainly wasn’t going to buy a combo pack, use the envelopes, and get left hanging with cards that had no envies. So I used mini square envelopes instead, but I really like the outcome.

The basic measurements: cut base to 4-1/2 x 12 (score at 1-5/8, 2, 5-3/8, and 8-3/4), cut black pieces to 5-1/4 x 3, score at 1), cut colored insert pieces to 4 x 2-3/4), cut outside band to 1 x 9-7/8 (score at 2-5/8, 3, 6-1/2) . You can probably figure out the rest.

For a simplified version of a photo wallet (made from 8-1/2 x 11 cardstock), check out these instructions on splitcoaststampers.

Decisions, Decisions

So, I went round and round in circles. I read everyone’s comments. I stared longingly at all of my stamp sets. I even moved the retired sets to their own shelf to “visualize” life without them. It was then that I realized that I have fewer non-retiring sets than retiring or already retired. By a long shot. Sheesh, those “current’ stamp shelves are going to need to be replenished!

While I hate to “lose” so many sets, I’m in a pickle. I haven’t met my quarterly minimum yet. I don’t know if I will before the end of June. And I can’t justify hanging onto “old” sets when we’re trying so hard to fundraise and commit my stamp profits to the adoption. So, I’ve decided that I have to sell (almost) all of my retiring sets. The only stamps I’m letting myself keep are the word stamps. Everything else has to go. Come July, (most of) my retired stamp sets will head to the auction block. In the meantime, however…

Congratulations to my {blog candy} winner, Alison!

Alison’s must-have retired set is Mixed Bouquet. She says, “I’ve been in love with it since it came out and just never got around to buying it.”

This is one of my absolute favorite sets too. I actually did a trade to get this set when it wasn’t available (after the mini ended, before the new IBC came out). It kills me to give it up after working so hard to get it. But I will. So, as a last hurrah to Mixed Bouquet and all of our gorgeous retiring sets, Alison is going to receive a handmade gift crafted from her favorite set. Since I just picked her name last night, I haven’t made her gift yet. So, stay tuned. I’ll post an update with pics just as soon as I can!

« Previous entries