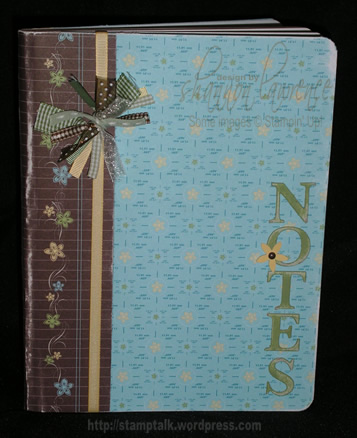
Ingredients: Composition book, Notations Paper (spring 07 mini), chipboard, Spring Bouquet punch, so saffron cardstock, brown brad, ribbon (misc).
Directions: for the outside, you’ll need two sheets of matching designer series paper (cut to 7-1/2 x 10-1/2) and a coordinating strip of designer paper for the binding (cut to 4-1/2 x 9-3/4). For the inside, you’ll need two sheets of coordinating cardstock (cut to 7-1/2 x 9-1/2). Use a small corner rounder to punch two corners on each sheet of cardstock (to match the corners that are already rounded on your notebook). For best results, run all pieces through a Xyron permanent adhesive cartridge. (Pay attention to how you lay the pages in the Xyron. It helps to lay out the pieces on the notebook and mark the back side of the paper. Remember that your cardstock when laying flat, should be mirror images of each other.) If you don’t have a Xyron, other high-tack adhesives applied manually and liberally should work fine.
To assemble, start with the back (just in case you mess up…it won’t be as noticeable here). I like to lay the paper on a table with the sticky side up then lay the notebook on top of it, leaving about 1 inch hanging over on three sides (all sides except the bound edge). Then open the notebook so that you’re looking at the inside of the cover. Use scissors to snip slices into each rounded corner (basically, this will look like fringe – for those of you who sew, this is the same as snipping to the basting line on any curved edge). Fold each of the corner fringe pieces over the cover as tight as possible, overlapping as necessary. This will create a much more clean and finished look than folding the corners without snipping. Once the corners are complete, fold over the long side, then fold over each of the short sides. Attach one of the cardstock pieces (centered) on the inside of the cover to hide the folded over paper. Repeat this process on the front cover.
With the notebook closed, you can now attach the binding. I usually “eyeball” this and don’t worry much about getting it perfectly even from front to back. Simply lay the pre-glued binding strip on the front of the notebook bound edge (about halfway), then gently press and wrap around to the back. Embellish as desired!


Kim K Said:
on March 25, 2007 at 10:36 am
Awesome easy to foolow directions Shannon. I to am loving this paper and having a blast with it. I am so sorry I sold off my Xyron 550 for $30 bucks.. It sat on the shelf for 10 months and I thought ‘use it or lose it’.. well I wish I had it now to make yesterdays fridge note keper you showed that’s for sure! Oh well.. live and learn. Keep the inspiration coming. Kim
doverdi Said:
on May 4, 2007 at 6:48 am
Thanks for the great, easy to follow tutorial. I have a composition book just waiting to be altered.