Renewed passion

Sorry that it’s been quite awhile since my last post. Motherhood has been a huge — great, but huge — time suck. But, recently, I have been inspired to carve out some “me” time. Two things happened that got my creative juices flowing.

First, I offered to deliver birthday cards for all staff at my son’s elementary school on behalf of the PTA. The principal’s birthday happened to be one of the first of the year, and I gave her a card assembled from some of the scrapbook elements swaps I hosted eons ago. She was so delighted that I was itching to design original creations.

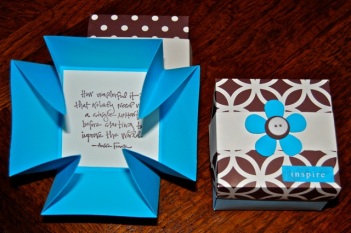
Then, this past weekend, I got my chance. I had auctioned off a card-making party at heritage camp this past summer and a friend who owns a post-adoption services organization purchased it as an activity for her twice-yearly adoptive mom’s retreat. Quite convenient since I had planned to attend anyhow! I talked her into letting me do something beyond cards, so I made three fun, simple projects that were adaptable to a variety of tastes and crafting abilities. The retreat was this past weekend and my nine fun-loving companions seemed to have a ball with the crafts, despite the fact that I was completely off my game (because I was extraordinarily sleep deprived and admittedly rusty).

Here are the projects we did, with simple instructions. I wish I had taken photos of the ladies’ finished creations, because they were all unique and wonderful!

Joy Fold Card – Click here for instructions

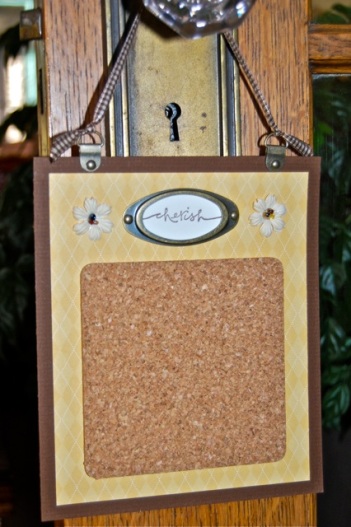
Mini Cork Board – Click here for instructions

Explosion Box – Click here for instructions

I {heart} teachers

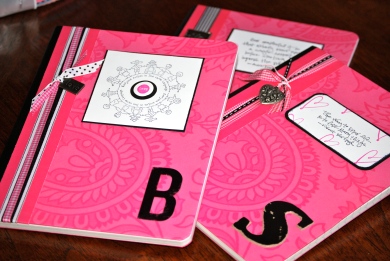
I know that teacher gifts aren’t the norm for this particular holiday, but I felt like doing something to make up for those horrid preschool Valentines. Okay, okay. They were so bad that my ego was shot, and I needed a quick fix. So, I whipped up three simple altered composition books for Joe’s teachers. They were bright, cheerful, cleanly modern, and easy to make. (I can’t find online instructions to match exactly the way I do it, but this is a decent video to give you the basic how-to. If you’re going for a really distressed look, you just trim the cover/inside exactly to size, then sand and ink like crazy to avoid wrapping. (Note: regardless of method, I prefer using thinner single-sided papers over cardstock or thick double-sided papers.) Note to self: check teacher initials in photo layout before uploading.

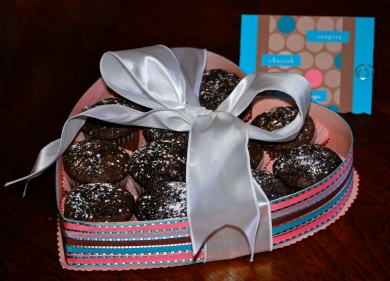
But I couldn’t leave it at that. I wanted to do something nice for the admin staff too. I saw this darling (and huge) heart box in the background of a Martha Stewart show. Of course, I didn’t bother to look up the instructions. My smaller version turned out fine on the fly, but I’d recommend reading the how-to to save yourself some trouble.

In lieu of candies, I opted for double chocolate chip cupcakes sprinkled with powdered sugar to give it more of a chocolate box appeal. I wrapped the whole thing in satin ribbon and hand-delivered to school this morning. Hope they liked it!

When Valentine’s Day (crafts) go wrong

I say, just go with it…at least I did for my kid’s first Valentine’s card exchange at preschool, even if they are quite horrible.

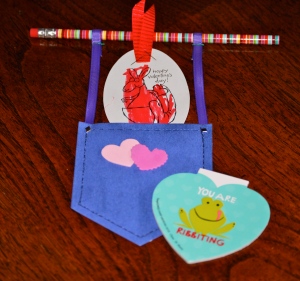
I thought I had a cute idea using supplies on hand: little jean pockets with a fake stitching into which I inserted a stamped tag that the kiddo colored and signed. And the tag was a kangaroo. Pocket. Kangaroo. Get it? Ugh. I know. They were ok, but they seemed…not enough. Maybe it was because I cheaped out and used my kid’s construction paper instead of cardstock (knowing that they’d be tossed or destroyed immediately). Then I found the cutest little (inexpensive) heart-shaped notebooks and pencils at Target, and decided to add those to the mix. Problem solved, right? Wrong. The notepads were a tad too big and the pencil wouldn’t stay in the pocket. And, worse, I hadn’t used sufficient adhesive and they were falling apart.

So, I had a choice. Toss and redo, maybe something that the kiddo could make himself…or try to fix what was wrong. Sometimes I really hate that I can’t be wasteful. I tried to save the Valentine’s. I sewed them together with the machine, so the stitching is real. I added ribbon (stapled around the pencils). The pencils still slip out, but hopefully most kids will get them. (The notepad does fit partway if inserted sideways.)

After all of that, Joe’s teacher didn’t hand out Joe’s valentines with all of the others. Talk about insult to injury. Thanks to a moment of grace, I didn’t burst into tears and toss them in the trash. In all fairness, it wasn’t her fault and she offered to hand them out tomorrow. Great, nothing like having cruddy work stand out on its own…ugh. Note to self: next time, just keep it cute and simple!

Tulip “Bouquet” for Teacher Appreciation Day

I found this cute “from the whole class” idea at Family Fun, so I offered to make something similar for Teacher Appreciation Day at my son’s preschool, which, incidentally, is today. (Actually, it’s Teacher Appreciation Week, but I’m delivering these bouquets first thing in the morning.)

After much brainstorming and trial-and-error, I came up with what I think is a significantly improved version of the “gift-card flower.” I created a self-pocketing tulip, opted for patterned (and textured) paper, and skipped the green plant in favor of a cute metal garden planter and chocolate. Really, who wouldn’t want chocolate?

DSC_0064

My lacking photography skills really don’t capture how charming these turned out (despite my considerably-less-than-perfect flower arranging skills, which rival only my photographic prowess–ha!), but you get the idea.

DSC_0104

The only problem may be that there are too many flowers, which make the bouquets look a little cluttered, especially since I have so many patterns at play. Given that these particular tulips, however, are stuffed with grateful words and goodies from appreciative families, I think that’s just fine. If I were to make this bouquet for a different occasion (say, for Mother’s Day or a bridal or baby shower), I might limit the total number of tulips per planter to somewhere between 6-10 for a cleaner look, or fewer if you want the look to be crisp and modern.

Here are basic instructions to make a dozen-flower bouquet.

MATERIALS

12 pieces single-sided patterned scrapbook paper, each cut to 3-1/2″ x 7″
12 large bamboo skewers (or long floral picks)
green floral foam
medium-size garden container for base (e.g., planter, bucket, watering can, etc.)
crimping tool
adhesive tape runner
single-sided tape (e.g., Scotch tape)
individually wrapped candy
scissors
wire cutters or other tool that can cut through bamboo skewer
Optional: large corner rounder
12 pieces of cardstock, cut to 2-3/4″ x 7-1/2″
small corner rounder

INSTRUCTIONS

DSC_0052

With wire cutters, trim bamboo skewers on flat end as follows: trim 2″ from 2 skewers, 3″ from 2 skewers, and 4″ from 1 skewer. Leave all remaining skewers at full length.

For each tulip, score patterned paper sheet at 4-1/2″ on the long side. Adhere tape runner (glue) to edges only of the smaller section. Hint: to create a narrow adhesive strip with a standard size tape runner, place papers tightly side-by-side (patterned side down) and apply tape runner to seam. Then separate and continue. Fold at score mark and press glued area shut, creating a pocket. Fold pocket in half lengthwise (without a hard crease). Use scissors (or large corner rounder) to round bottom (folded side of pocket) and cut tips of petals at opposite end by cutting what is essentially a curvy “V.” (I personally prefer the variation that comes from cutting freehand, but if you really, really don’t think that you can do this without a template, leave a comment and I’ll try to post something to share.) Unfold and run through paper crimper. This texture adds a nice dimension, hides any creases that may have been created, and helps to give the flower a more curvy shape.

DSC_0061

To assemble flowers, run pointed end of skewer through middle of pocket and poke through bottom. Use a piece of Scotch tape to adhere top of skewer to inside front of the pocket. Do not adhere to back or flower will fall forward. Hint: if using multiple patterns, determine flower arrangement prior to inserting different length skewers.

DSC_0052

To create the card insert, score the cardstock on the long side at 3-3/4″ and fold in half. Use corner rounders to snip the corners on the non-fold edge. Write a note, decorate the card, insert gift card or other small, flat favor, and insert, open-end down into flower pocket. Optional: some gift card holders are small enough to fit inside the pocket without protruding and you can write a note on the blank side of the gift card holder instead of making a card insert.

To assemble flowers in container, first fill container with floral foam, leaving 1-2″ of space at top of container. Arrange flowers by inserting skewers firmly into foam. Use flowers with shorter skewers at the front and fill in with progressively longer “stems” towards the back. Once completed, arrange candy to hide foam.

SUNFLOWERS

DSC_0082

I also wanted to thank a few special staff who have been so very kind and loving to my son, so I whipped up a handful of single-stemmed options just from our family. The inspiration for these came from my former flower creations like chocolate vases, in which I created flowers from assembling punched shapes. This simple sunflower is made from 20 oval punches (petals), 2 large circle die-cuts (center), and medium and large oval tag die-cuts (leaves, which fell down for this photo, but normally sit somewhat upright). I particularly love the way the thinner single-sided scrapbook paper lets the light shine through.

There are about a million ways to vary these ideas, so feel free, as always, to CASE (copy and share everything). Please just link to this page and give credit to the concept (Family Fun) and my original designs. Enjoy!
Happy Birthday, friend!

It’s my friend’s birthday today (Happy Birthday, Bobbi!). So, I sat down the other day to make her a card. To get my crafting gears lubed up, my philosphy has been, quite simply: keep it simple! So I made a card with “stickers” (from a retired SU! Simply Scrappin’ kit), colored chipboard, a wild vintage button from my collection, and a simple orange flower brad on SU! Regal Rose cardstock (sorry, I could not get the color adjusted on this first photo at all). Then, I made a second card because I really wanted to see what that giant flower sticker would look like sort of hanging off the card (and, well, I had the extra card already cut out and scored…).

DSC_0057

And then…What started out as a one-card naptime effort turned into a Nap Scrap Challenge. Basically, I challenged myself to make as many simple but attractive cards as I could during the rest of my son’s nap using only “scrap” embellishments…leftover stickers, flowers, brads, ribbon, etc. from other projects. These six cards were the outcome. Baby steps! (The cardstock for these cards were various shades of coral and rose, all textured, makers unknown.)

DSC_0054

DSC_0061

DSC_0048

Simply Groovy

Groovy - outside I found this really funky Around the Block paper at Dollar Tree and it’s been sitting in my paper files ever since. I can’t tell if I love it or think it’s horrid. The color is indescribable, but it definitely has a retro feel. I had trouble with the lighting in the photo, so the color isn’t quite accurate. The green is far less lime and more olive, but not quite. I paired it with pumpkin pie cardstock, a retro flower, an orange button, and a lime flower brad. The letters are Funky Alphabet Sizzlits. The finished card size is 6×6 with a 1-1/2″ foldover on the front cover. I mirrored the flower on the inside. I wrote “Hope your birthday was…” with a brown Sharpie, but you could print out a nice font on cardstock. Love it? Hate it? Feedback welcome.
Groovy - inside

Here comes the bride (and groom)

Engagement - outsideMy brother is getting married this summer and I think it’s pretty safe to post my card ideas since I doubt he reads my craft blog. (His fiance came onto the scene after my blog hiatus began, so she’s not likely to see these either.) I heard through the grapevine that the wedding colors were “purple,” but I wasn’t sure if that meant true purple, or a lighter lavender. Then I ran across a single textured sheet of pretty purple cardstock and decided to have a go at an engagement and wedding card anyhow.

Engagement - inside

The  “Congratulations on your engagement” card (which I completely winged with no visual inspiration) is a basic, vertical, almost envelope-style tri-fold. I added a strip of gold cardstock under the flap (to lengthen it) and scalloped the gold. I added a ribbon to mask the transition between the two cardstocks and embellished with layered flowers and a tiny lavender flower brad. (The circular bronze paper clip was just there to hold the card shut for the photo, but I kind of like it and may work it into the card if I can.) Then, I wanted to incorporate some old Sell-a-bration stamped images that I had in my stash (already colored and decorated with dazzling diamonds!), so I first added a lavender layer to the inside of the card, then punched a circle in the lower flap, and glued on the “Congratulations” image to the inside of the card, lining it up to show through the window.

Wedding cake card

For the wedding card, I found my inspiration in Paper Crafts magazine (an older edition). I used the same base purple textured cardstock for a 6×6 card (12×6 folded in half), then layered with silver and shimmery white cardstocks. I used a fancy corner punch on the shimmery white, stamped and embossed in silver the word “love,” then cut three graduating rectangles out of a retired patterned vellum to create a wedding cake shape and glued onto the shimmery white. (Hint: run vellum through an adhesive machine for a perfectly even coating; otherwise, you may see the adhesive under vellum.)

I then embellished with paper flowers and small jewels (and probably overdid the jewels!). I may add more to the top of the cake to make it look more finished. I may not.

In hindsight, I wish I had converted the word “love” to a flower stem rather than placing the flower off to the left (which is how it was in the inspiration card). I could nit-pick this card to death, but it’s still rather pretty (especially in person) and I had fun making it. Isn’t that the point?

I’m baaaackkk…

Valentine's Day Teachers Gifts

I was beginning to think that my crafting hobby was a lingering, fuzzy memory from a past life. Then, a few months ago, I finally organized my long-awaited, cozy craft room, but I felt far too overwhelmed by too many supplies. Rubber stamps seemed completely daunting. And it was hard to remember what item was in which drawer. I felt like I was going shopping every time I looked for something.

But, last month, my son’s preschool hosted a grandparents day picnic and asked parents to bring a boxed lunch in a decorated a shoe box. I had several tin lunch boxes in my stash, so I went ahead and did a very basic design with patterned paper and a few embellishments on a couple of purse-style tins. They were too basic to warrant a photo, but Nana and Noni loved them.

With my confidence renewed, I was inspired. I tabbed through magazines, marking cards that I wanted to create. (Cards have a real appeal because they’re small, easy, and offer instant gratification.) But special occasions were flying by, work deadlines were pressing, and I just couldn’t carve out any significant time to wrap my head around a creative project.

I had these fab containers taunting me (from Wall Words, those vinyl removable sayings) and I had to do something with them. I thought I might decorate and fill them with goodies for Joe’s teachers, but Valentine’s Day rolled around and they were still sitting there, untouched. And I showed up at my son’s school Valentine’s party empty-handed. I came home from the party determined to at least make an effort. I found an easy recipe for a quick, homemade white-chocolate-almond-cranberry bark, then did a simple paper wrap and added a few embellishments and a tag. I was able to deliver them back to the teacher before they went home for the long weekend. I think they turned out pretty cute for someone who is baby stepping backwards into her happy hobby.

It’s official

I’m no longer a Stampin’ Up! demonstrator. Despite valiant efforts on the part of folks who placed orders (thank you soooo much!), I was still short in making my quota. The good news is that I can rejoin Stampin’ Up! in 6 or more months if I want to. I’d have to start from scratch, but that’s ok. This also means that I’ll be able to sell any of my products, current or not, without repercussion. I may downsize my supplies, considerably, so stay tuned. In the meantime, I still have a backlog of projects to make, but it’s taking us longer than expected to get settled in the new place.

The end of an era?

I’ve had…no, I have…too much on my plate with a new baby and major move, so I wasn’t able to make my Stampin’ Up! sales last quarter. I have until the end of July to finish up prior sales plus make up a “good faith” percentage of this quarter’s sales, but I can’t do it on my own. As a last-ditch effort, I’m offering my discount (20% off) to anyone who wants to place an order (shipped directly to you) through the month of July. Feel free to contact me if you have any questions.

If I don’t meet my quota, I won’t be a Stampin’ Up! demonstrator as of August. What that means for this blog: not much, hopefully. I fully intend to keep the blog active, though (realistically) I won’t be posting much in the next 6 months given my schedule and the fact that we’ll begin house-shopping in the next few months. However, I still need to make “10 things” for a friend who has already paid me and I have a thank you note order to fulfill. So you will be getting a few new-project updates; they just may not include the latest-and-greatest or sneak peeks of Stampin’ Up! stuff.

p.s. I do have all Sale! page items accessible and once again available for purchase.

« Older entries