Archive for altered

I’m baaaackkk…

Valentine's Day Teachers Gifts

I was beginning to think that my crafting hobby was a lingering, fuzzy memory from a past life. Then, a few months ago, I finally organized my long-awaited, cozy craft room, but I felt far too overwhelmed by too many supplies. Rubber stamps seemed completely daunting. And it was hard to remember what item was in which drawer. I felt like I was going shopping every time I looked for something.

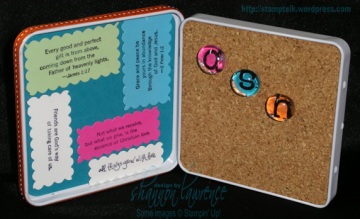
But, last month, my son’s preschool hosted a grandparents day picnic and asked parents to bring a boxed lunch in a decorated a shoe box. I had several tin lunch boxes in my stash, so I went ahead and did a very basic design with patterned paper and a few embellishments on a couple of purse-style tins. They were too basic to warrant a photo, but Nana and Noni loved them.

With my confidence renewed, I was inspired. I tabbed through magazines, marking cards that I wanted to create. (Cards have a real appeal because they’re small, easy, and offer instant gratification.) But special occasions were flying by, work deadlines were pressing, and I just couldn’t carve out any significant time to wrap my head around a creative project.

I had these fab containers taunting me (from Wall Words, those vinyl removable sayings) and I had to do something with them. I thought I might decorate and fill them with goodies for Joe’s teachers, but Valentine’s Day rolled around and they were still sitting there, untouched. And I showed up at my son’s school Valentine’s party empty-handed. I came home from the party determined to at least make an effort. I found an easy recipe for a quick, homemade white-chocolate-almond-cranberry bark, then did a simple paper wrap and added a few embellishments and a tag. I was able to deliver them back to the teacher before they went home for the long weekend. I think they turned out pretty cute for someone who is baby stepping backwards into her happy hobby.

Yes, I did fall off the face of the planet

I’ve been in heaven! I became a new mom a little over two weeks ago. You can read all about my beautiful new baby boy (and see lots of pictures, more of which will be posted shortly) on our family blog. I’ll respond to Sale page requests and pending emails shortly!

On the stampin’ front, I whipped up this quickie 5×5 altered book for my friend’s baby shower before the stamp room gets packed up for the move. (And I did it wearing my baby!)

I wanted a little notebook where guests could write in advice to the new mom and this 5×5 was the perfect size (and with 20 pages, the really really perfect size).

Patterned paper is a combination of the not-yet-released new designer series paper and some spring paper from 06, I think. Crafty postings will resume in July once we get settled in our new house.

You may not hear much from me here in the next several weeks, but I promise to come back with lots of new ideas once the new catalog is released in July!

[Re]Mixed Bouquet

Distressed Emboss??

OK, folks, I’m not sure if I created a new technique (or discovered an existing one I didn’t know about), or if this is a total flop. You tell me. (Seriously, I’m pretty thick-skinned.) I decided that I hated the old frame matte in those springy colors (I’m such an “earth” person), so I revamped it into something that I might actually use.

First, I inked the entire matte with Old Olive (craft) ink. Once that dried (with the help of a handy dandy heat gun), I stamped the rose from Mixed Bouquet in Versamark around the frame and sprinkled on gold embossing powder.

But…the excess embossing powder wouldn’t shake off. (That craft ink has to be really, really dry. Think days.) I brushed off as much as I could without knocking too much powder off of the images and heat set it anyhow. The mottled effect was kind of groovy, and I liked the subtle emergence of the roses here and there. So, I repeated the embossing with a chocolate embossing powder for some pop. (Oddly, this time, the craft ink was dry and the excess didn’t stick.) I actually liked it, so I decided to leave well enough alone.

I think it’s got potential. I’m calling it “distressed embossing,” unless, of course, the technique already exists (please, someone clue me in here).

Something for mom (or grandma, or…)?

Mother Clipboard

This is one of the projects we made at my last stamp class. I couldn’t resist this gorgeous color combination in shades of sherbet (click on image for recipe).

The basic layout is the same as my Chipboard Clipboards, but this time I used the double-sided paper from the Spring mini. Aren’t these stripes just scrumptious?? As with the previous edition, these are intended to be photo magnets. Perfect for the fridge!

Here’s an idea: simply replace the word “mother” with “daughter” or “son” or “family,” trim a favorite photo to 3×3 and clip in for a Happy Mother’s Day! Or, make for each of the (grand)kids and I’ll bet they find a favored spot on the fridge!

Alternative: the clip is completely removable, so you could alter both sides with different (seasonal?) colors. Then mom/grandma can flip it over for a change of scenery!

Take it or leave it?

Mixed Bouquet Matte
I have mixed feelings about this Mixed Bouquet frame matte. I hesitated even posting it here and I didn’t put my watermark on it (Images copyright Stampin’ Up!). Originally I thought it would look nice in a stamp room with some kind of saying inside (“inspire” “create” or a nice phrase?). The matte is big (11×14) and will hold a regular-sized sheet of cardstock, so I figured that printing something out on the computer would be ideal. But I’ve been going back and forth about it. One minute I hate it, the next I love it. Right now, I hate it. I can’t tell if it’s the ink colors (click on image for a list)? The vanilla background? The gold matte liner? The stamp set? What do you think?

yummy!

spoon handles
I had a little get-together with a couple of my stampin’ buds. The talented Micki (one of my downline) made these gorgeous beaded serving spoons at Christmas and then promised to show us how to make them. Last night, we finally had the chance to learn how to create our own yummy servers.

My first attempt (far right) is for my MIL for Mom’s Day. (The similar one on the left is for my GMIL. Think their both red-hatters?) Neither read my blog, so it’s pretty safe to post here. 😉

green and white spoons

I  was so addicted that, even after the gals left, I stayed up until 3am playing with beads. This is what I came up with. I had a bunch of my own white and clear beads, so the white spoon was the product of me trying to use up my own stash. I wasn’t thinking of this at the time, but Dan mentioned that it would be good to use at a wedding. Hmmm…. (I was just being practical and thinking that white went with everything, silly me.) I wanted to make another one for a friend’s birthday, but I couldn’t decide what colors I wanted to use, so I just started beading randomly. I’ve had a green thing going on lately, so the green one kind of emerged on it’s own.

The spoons are relatively easy to make, especially if you’re comfortable working with wire. (I admit that I am not a bead person, which was evident when I managed to jiggle a bead case open, nearly dropped it, and beads went flying. Part of my early morning hours were spent hunting down seed beads on my basement floor…) But, I can handle wire and a pair of pliers, so I managed okay.

What you’ll need: stainless steel serving utensil (MUST have hole at top of handle), 20-gauge stainless steel (or silver) beading wire (1-2 yards, depending on size of utensil), assorted beads (different sizes and shapes, including small and medium seed beads for filler), beading pliers (needle nose pliers especially), patience.
red hat spoons

To start, wrap the wire around the base of the handle. Leave about 1-2″ of wire on the short end, then twist twice tightly (like a twist tie). Leave the short wire alone for now (we’ll come back to it later). Wrap wire around back of handle tightly (bead only on the front of the handle), then add as many beads as will fit across the front. Wrap wire around back of handle tightly, and repeat until you get to end of handle with hole. There are several finishing options. The easiest is perhaps to do a “figure eight” back and forth through the hole, adding beads when the wire is on the front of the handle. When the handle is full, wrap wire several times through the wire on the back of the handle (sort of like tying a knot). Secure and finish off by using needle nose pliers to create a spiral. Make sure wire is tight and will not unwind. Use needle nose pliers to make a spiral with the extra wire at base of handle.

Rather buy one? I bet Micki would happily make one for you (she’s definitely a beader and probably has great taste in bead selection). Or, I’d make ya’ one too, especially since I’m still selling everything I can for our adoption fundraiser.

Random thought: I might have to rename this blog “craft talk” if I keep deviating from the paper crafting stuff — oh, who am I kidding, the second I get my hands on the new SU! catty, it’ll be ALL stamps ALL the time!

Tootin’ horns

Yep, I’m tootin’ my own. I was listed, along with several fab crafters, on Craft Critique’s Altered Items Carnival today. No way! Little ol’ me? Anyhoo, this site has some awesome samples and links to groovy projects, so I recommend checking out their great ideas (click on image).

And don’t forget that I’ve got my first (surprise) blog candy up for grabs. You can see the details and enter for the drawing here. I’ll post a picture before I send it out.

Upcoming events for the local crowd:

  • Meeting for the Brad-y Bunch (my awesome downline), Friday, 6pm, bring a dish.
  • Stamp Class, Thursday, May 10, 6:30pm. 3 projects, $10 fee. RSVP by tomorrow.

all-in-one

magnet-tin-outside-web.jpgYou may remember that Target carried these little magnetic checkerboard tins around the Easter holidays. I jumped on the bandwagon and bought one then. Just one. This is what I created (gift #5 for my generous friend). The outside is simple enough: your basic altered tin decorated with cardstock, designer paper, stamps, ribbon, and other embellishments.

The inside of the container is another story. I had these groovy thin 4″ cork coasters with rounded edges that fit perfectly inside the container. I layered four of them — no glue (that’s how great they fit) — to create the corkboard. (Unfortunately, you’d be hard-pressed to find these cork coasters today…they’re about 3 years old from IKEA. But, you could cut thin cork sheets to size and layer for the same effect.) magnet-tin-inside-web.jpgThe thickness of the cork perfectly accommodates the glass marble tacks (thumbtacks, 1/2″ stamped circles of cardstock, flat-backed glass marbles, and Crystal Effects).

On the left inside of the container, I layered a piece of cardstock over the tin, then used my Xyron 900 with a magnet cardtridge to create some little magnetic inspirational sayings (shown in storage mode) that could easily be moved around to the front, back, or inside lid of the tin — or used anywhere a magnet could go.

notebook necklace

notebook necklaceThis handy dandy notebook (mystery project #3) is convenient to use and super easy to make too!

This is a teeny tiny notebcook (about 2×3) and mine luckily came with the chain, but you could replicate it by using a small notebook (get one with a nice spiral bind) and adding a long chain.

The design is fairly self-explanatory: alter as you would any notebook or 3-D project. I used Dots & Dashes designer series paper, Taken with Teal cardstock, and some pink polka dot ribbon from Michaels. The silver dots on the cover are actually the second page showing through holes. (This notebook cover already had the holes, but yours can still be perfectly spaced and aligned by using the paper piercing template from the Crafter’s Tool Kit!) As usual, I gently sanded the edges for a slightly distressed look.

After the photo was taken, I embellished just a tad bit more. Embellishments to consider: flowers, words, tabs, etc.

Variations: keychain, “purse” notebook, etc.

chipboard clipboards

A dear online friend trying to help me raise funds for our adoption sent me a check with instructions to make her “5 things.” Any five things, no instructions, no guidelines. I had big plans at first, but I had to rethink that approach when I realized just how overwhelmed I have been: juggling the enormous task of prepping the house (which still isn’t totally complete), finalizing the initial stages of the adoption paper chase, working my day job (which I had nearly abandoned entirely), and trying to negotiate the day-to-day stuff, including somewhat regular house showings.

I tried to keep these projects fairly simple, both because I think this modern/retro style is, as she puts it, “out of her dot box” and because I felt inspired to work with bright, bold colors. For most projects, I used this fun Dots & Dashes paper. I’ll present one project a day for the next five days. (Hey, I need some fodder to keep folks entertained!)

Chipboard Clipboard Photo Fridge Magnets

Here’s the first: chipboard clipboards that work perfectly as photo fridge magnets (inspired by cover images of the Summer 07 Winter mini catalog). I used medium weight 4″ square coasters, covered the front in patterned paper, and sanded the edges for a gently distressed look. Then I tied on a decorative ribbon (no glue, so that the knots could be easily moved around) and added a magnetic clip (removable…it’s just clamped on). The photo shows minimal embellishments, but I did add a circle and button to the “boy” version and tabs on the opposite sides from the bows. Sorry I didn’t have time to update the photo before these were shipped off — but she neede some surprise, don’t you think?

Update: My Sale! page was last updated today. Please visit and see if there’s anything you want. A special thanks to those who have made purchases so far!

« Previous entries