I’m no longer a Stampin’ Up! demonstrator. Despite valiant efforts on the part of folks who placed orders (thank you soooo much!), I was still short in making my quota. The good news is that I can rejoin Stampin’ Up! in 6 or more months if I want to. I’d have to start from scratch, but that’s ok. This also means that I’ll be able to sell any of my products, current or not, without repercussion. I may downsize my supplies, considerably, so stay tuned. In the meantime, I still have a backlog of projects to make, but it’s taking us longer than expected to get settled in the new place.
Archive for personal
The end of an era?
I’ve had…no, I have…too much on my plate with a new baby and major move, so I wasn’t able to make my Stampin’ Up! sales last quarter. I have until the end of July to finish up prior sales plus make up a “good faith” percentage of this quarter’s sales, but I can’t do it on my own. As a last-ditch effort, I’m offering my discount (20% off) to anyone who wants to place an order (shipped directly to you) through the month of July. Feel free to contact me if you have any questions.
If I don’t meet my quota, I won’t be a Stampin’ Up! demonstrator as of August. What that means for this blog: not much, hopefully. I fully intend to keep the blog active, though (realistically) I won’t be posting much in the next 6 months given my schedule and the fact that we’ll begin house-shopping in the next few months. However, I still need to make “10 things” for a friend who has already paid me and I have a thank you note order to fulfill. So you will be getting a few new-project updates; they just may not include the latest-and-greatest or sneak peeks of Stampin’ Up! stuff.
p.s. I do have all Sale! page items accessible and once again available for purchase.
Yes, I did fall off the face of the planet
I’ve been in heaven! I became a new mom a little over two weeks ago. You can read all about my beautiful new baby boy (and see lots of pictures, more of which will be posted shortly) on our family blog. I’ll respond to Sale page requests and pending emails shortly!
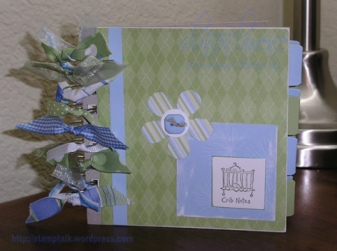
On the stampin’ front, I whipped up this quickie 5×5 altered book for my friend’s baby shower before the stamp room gets packed up for the move. (And I did it wearing my baby!)
I wanted a little notebook where guests could write in advice to the new mom and this 5×5 was the perfect size (and with 20 pages, the really really perfect size).
Patterned paper is a combination of the not-yet-released new designer series paper and some spring paper from 06, I think. Crafty postings will resume in July once we get settled in our new house.
You may not hear much from me here in the next several weeks, but I promise to come back with lots of new ideas once the new catalog is released in July!
Tag, I’m it!
I got tagged the other day by Paula. I’m supposed to tell you 7 things about myself, then tag 7 people. I was out of town when this happened (all those posts last week were pre-scheduled…sneaky, huh? 😀 ). So, now that I’m back, here are my 7 things:
- I’ve been married to my husband, Dan, for almost 8 years. We met in 1998 during an intensive summer language institute at UC Berkeley. We married a year later and had an incredible Scottish ceremony, bagpipes, celtic harp, and all.
- I used to compete in Scottish Heavy Athletics with Dan and his brother.
- I lived in Australia for a year during 1988 and went to the World Fair in Brisbane almost every day.
- I’ve never lived in the same house for more than 4 years. Ever. In my entire life.
- I became a Stampin’ Up! demonstrator on March 30, 2003.
- I became a Stampin’ Up! supervisor in 2005. (Currently I have 3 awesome downline, and 1 “adoptee.”)
- I collect MyCokeRewards points. (Trying to save enough to earn a video camera before we head to Ethiopia to pick up our kids.)
I’m tagging these people:
- Bobbi, Ink Impressions
- Karen, Watercolor Dreams
- Michelle, My Inky Fingers
- Kim and Sandy, We Luv Cardstock
- Karen, I Love Stamping & My Pets
- Lorien, StampsNMore
- Debbie, Thinking Inking
Redux: Snoopy in the round
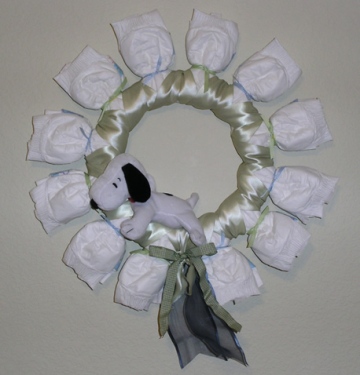 I made this wreath to go with the Snoopy diaper cake for my preggers friend. It was super easy!
I used a flat wood 12″ wreath ring (instead of the oft-suggested styrofoam) and 13 size 1 diapers. Simply wrap each diaper over the edge of the ring and secure with rubber band. (I then tied alternating celery grosgrain and light blue gingham ribbons to cover the rubber bands. To create the criss-cross base (I used green satin ribbon), simply wind a soft ribbon continously between each diaper (once), then repeat in the opposite direction. Decorate as desired and voila!
I kept it simple with one little Snoopy beanbag and some ribbon (I may still tweak the ribbon to balance it out), but you may like to decorate with lots of baby goodies, such as pacifiers, rattles, booties, etc. If you want to make a “floral” wreath, consider embellishing with baby sock roses!)
My first…
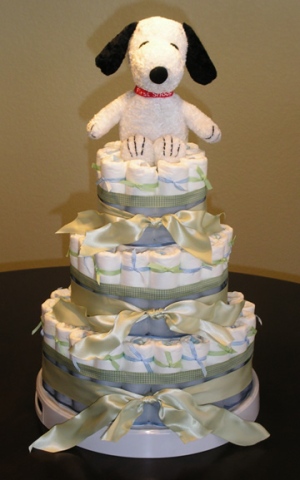
OK, this has nothing to do with stamping, but it’s still crafty, and I just had to share.
When I stumbled across this awesome site for diaper cakes, I just had to get one for my preggers girlfriend. But I’m on a pretty strict budget with the adoption, and while I think these cakes are worth the cost, I had to find a way to make it more affordable while sticking to her theme.
This was my first effort and I’m pretty darned pleased with the results (although the photo doesn’t do justice to the colors). Even Dan walked by it and yelled at “that’s too cute…so cute it shouldn’t be allowed.” Yep, I blushed. I love getting crafty compliments from my DH!
I learned several valuable lessons along the way, so I thought I’d share:
- If you can afford it, buy one. (If you’re not a perfectionist, don’t have five hands, or don’t have time/patience, the extra cost might be worth saving yourself from some frustration.)
- If you make your own, use the “rolled” method. It’s easier, plain and simple.
- Use rubber bands (not tape or floral tape) to hold the rolled diapers. White or clear rubber bands would be ideal, but I wasn’t able to find these easily. Hint: buy a pack of teeny tiny rubber bands in the hair accessories section (the kind you use for braids/cornrows).
- Don’t use “sheer” ribbon for “rolled” diaper cakes. Those rubber bands will show. Unfortunately, I didn’t realize how much they’d show until I had already assembled my cake and realized that, at table level, the angle is different. So even though the solid ribbon covers the rubber bands when the tier is at eye-level, when set on a table, you can see them. They don’t show in the photo, but curious guests will more than likely want a closer look. I hate shoddy work and loose ends, so chances are that I’ll take it apart and find some white ribbon to cover the rubber bands or replace the blue sheer ribbon altogether. Sigh.
- Don’t tie the individual diapers with ribbon like I did. This looks cute, but takes an enormous amount of ribbon (which is pricey) and makes it harder for the mom-to-be to unwrap the diapers when she needs them. Again, this didn’t dawn on me until I had tied all the diapers (duh). But given the work I already put into it, I’m leaving them as-is!
- Use a generic brand of diapers to save money or to create a different look. Target’s generic brand are blue with clouds and would work well for boy themes. Parent’s Choice (Walmart, shown) has a colored band that shows up in the center when you roll the diapers. You could use paper shreds (basket stuffing) in between each tier to “hide” the little bit of color that shows. But I like the color showing, so I’m leaving it. (You could also roll the diapers in the opposite direction to ensure that the colored band is on the outside and visible. It’s another nice decorative effect that doesn’t cost an extra penny!)
- Use a perfectlly cylindrical center/core if possible. It will require a lot less adjustment and padding. I used a cylindrical “jar” of Dreft for the first tier and a generic bottle for the second/third. I haven’t tried it, but I wonder if a styrofoam cylinder (wrapped in something to avoid shedding) would work???
- Use larger rubber bands as your “extra hands” while assembling each row of diapers. They work great to hold the whole tier together too. I just tied ribbon over them. (But, again, don’t use a sheer ribbon!)
- Avoid expensive “fillers” (if you’re looking to cut costs). Where I needed more padding, I used extra diapers instead of blankets. This worked well.
- Look for bulk ribbon. The wide mossy/celery-colored wire-edged satin ribbon I found at Costco was 50 yards for $7. (Yes, I did say 50 yards. You won’t find that at Michael’s or Joann’s even with those coupons.) For thinner ribbons, I still think Stampin’ Up! has the best deal, even if you’re not a demonstrator (15-25 yard spools). You could also avoid the high-cost satin ribbons by using acetate/floral ribbon. But I’m admittedly a ribbon snob and I think those other types of ribbon look too cheap. Stick with the satin or grosgrain for a high-end look.
- Keep it simple for a more professional (and cost-effective) end result. I let the ribbons be my decoration, then just topped it off with one stuffed animal. This cake is primarily intended to be a (useful) centerpiece, not a gift. Of course, if the cake is a gift and you want to include lots of accessories, then go for it! Hint: go to high-end discount stores for best buys on stuffed animals and baby accessories (TJMaxx, Baby Depot, Tuesday Morning, etc.).
So, want to make your own? Try this website for good basic instructions. Or, if you’d rather buy one, Lil Baby Cakes (mentioned above) has great designs. I’m also thinking about going into the diaper cake business as (yet another) way to help raise adoption funds. Drop me a line if you’re interested!
And stay tuned…a diaper wreath is next!
Testing, testing…is this really MY blog?
Well, folks, I did it – I think. I started my own blog! And I did it all by myself. The DH didn’t have to set it up for me (though he still has to get it over to my webpage). But hey, it’s a start, and a good one, I hope. My plan is to post daily and I’ll try to post projects as often as possible, and I’ll also include stamping and crafting thoughts, ideas, and personal updates as well. I really hope you enjoy my new blog. Feel free to share it with anyone you think might be interested.

